


Detailed step-by-step guide on how to clean your Semrock Optical filters, also available as a download.
Cleaning Basics
While Semrock manufactures the most durable optical filters available, it is important to note that all optical components are delicate and should be handled with care. Always avoid or minimise direct contact with any optic. If you are not handling a Semrock filter, check with your filter vendor to ensure that the use of cleaning chemicals and solvents will not damage the filter. Because Semrock supplies only hard-coated filters, all of Semrock’s filters (even dichroics) may be cleaned using the following recommended method.

Watch the instructional video here:
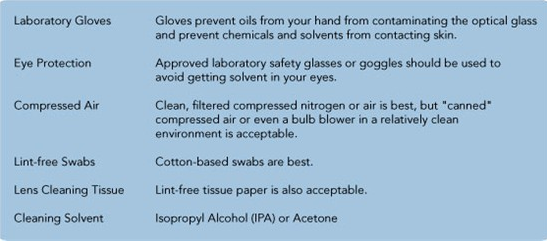
Materials:
The following materials are recommended to properly clean your filters:
Procedure:
1) Blow off contaminants. Many contaminants are loosely attached to the surface and can be blown off. Using laboratory gloves, hold the filter in one hand. Always use a gentle to moderate air flow and maintain an oblique angle and remember to begin the air stream while pointing away from the filter first, then slowing move the air stream over the filter surface at an angle. Repeat this process on the other side of the filter.
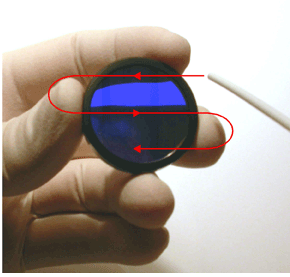
2) Clean filter. If dust or debris remains, it is probably “stuck” to the surface and must be removed with mechanical force and/or chemical action. Create a firm, pointy tip with the lint-free wipe or lens tissue by folding it multiple times into a triangular shape or wrapping it around a swab. Lint-free swabs may also be used in place of a folded wipe. Moisten the wipe or swab with isopropyl alcohol or Acetone, but avoid excess solvent. If the wipe or swab is fully saturated, it should be gently shaken or dabbed on a wipe to remove excess drops of solvent. Remember to use a new wipe or swab with each cleaning attempt.
Note:
IPA and Acetone each have benefits and drawbacks. Generally, more active solvents (like acetone) attack a broader range of contaminants more quickly, but also evaporate more quickly than gentler solvents. Acetone has excellent cleaning action but it dries very quickly and is thus much more susceptible to leaving behind residue on the surface of the optic. Furthermore, care should be taken when using Acetone around certain plastics and most adhesives, as these can also be dissolved by acetone. IPA may require the user to wipe multiple times to remove all contaminants but dries slowly, reducing the risk of leaving a solvent residue on the optic.
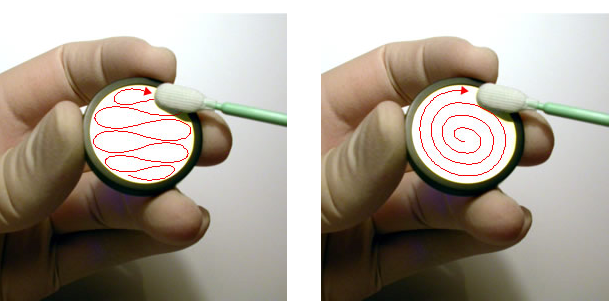
Maintain continuous motion at a constant speed, but do not apply pressure to the swab or wipe. Some people prefer to clean using a “figure 8” pattern (shown below, left) while others choose to start in the center of the part and wipe outward in a spiral pattern (shown below, right). Each time the wiping motion comes to a stop, it is likely that residue will remain on the surface at that point, so maintain constant speed until the swab has moved off of the surface of the optic.
Note: The optimal wiping speed is determined by the solvent and environmental conditions – the faster the solvent evaporates, the faster you should wipe (hence Acetone requires a faster wiping speed than IPA, for example). When wiping at just the right speed, you should see signs of the solvent evaporating on the surface only a few millimeters behind the moving wipe tip.
3) Inspect filter. Use a room light or any bright light source to inspect the optic to ensure that it is clean. Tip, tilt, and rotate the optic while viewing it as close to your eye as you can focus. If contamination remains, start with a brand new wipe or swab and repeat step 2 above. For every new cleaning attempt, ALWAYS use a new wipe!
4) Repeat steps 1 – 3 for the other side of the filter if contamination exists.
Orientation of Semrock Filters
Because of the durability of Semrock filters, you can easily populate filter cubes, filter sliders, and filter wheels yourself without fear of damaging the filters. To maximise intended transmission and blocking and to minimise autofluorescence, filters must always be oriented so that light is incident on a specific surface of the filter. This note describes the correct orientation for the different filter types.
Orienting Housed Excitation and Emission Filters
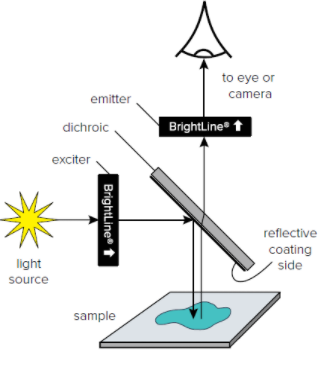
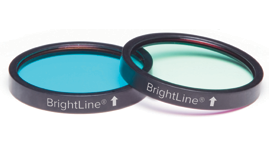
Semrock exciter and emitter filters mounted in housings feature an alignment arrow on the housing; see the illustrations below. Orient such a filter so that the arrow points in the direction of light propagation. For microscopes, the exciter filter arrow should point away from the light source and towards the dichroic beamsplitter, and the emitter filter arrow should point away from the dichroic beamsplitter and towards the eye, detector, or camera.
Dichroic beamsplitters are rarely mounted in housings. See below for guidance.
Orienting Dichroic Beamsplitters and Other Unhoused Optical Filters
Dichroic beamsplitters and other unhoused optical filters feature orientation marks that identify the coated surface upon which light must be incident. An orientation mark is placed either on the front surface of the filter, or on the edge of the filter as a caret (^) mark. The different types of orientation marks are shown in the following drawings along with the corresponding orientation guidance.

- Semrock logo: The logo is on the surface facing the incident light.
- Line: A short line is on the surface facing the incident light. The line may be easier to see if viewed at an oblique angle.
- Dot: A small dot is on the surface facing the incident light. The dot may be easier to see if viewed at an oblique angle.
- Caret: A caret on the edge of the filter points in the direction of light travel. When the viewer faces the surface that receives the incident light, the caret points away from the viewer.
Caution: A number of dichroic beamsplitters have coatings on both surfaces. Always use the above instructions to identify the coated surface that should face the incident light! If you encounter any ambiguity or difficulty, please contact Laser 2000 for assistance in identifying the surface orientation.
If you have any questions, get in touch! Our Semrock specialists will be happy to help.
Other Blogs/Articles that may be of interest:
- Why is Mid-IR Light so Important?
- Engineered Point Spread Functions (PSF) for Single Molecule Localisation Microscopy (SMLM)
- Nanoscopy for less than £100k?
- Understanding the jargon of LCOS Spatial Light Modulators (SLMs)
- Spatial Light Modulator Applications