Understand the requirements for accurate and reliable laser test and measurement
Written by our partners Bristol Instruments and our BioPhotonics Team Leader Peter Collins, this blog explores the difference between the two main wavemeter techniques of scanning Michelson and static Fizeau interferometers. Detailing the requirements for accurate and reliable laser test and measurement, using TDLAS as a practical example.
Written by Peter Collins
10-15 minutes Read

Contents
- Laser Wavemeter and Spectrum Analyser introduction
- Michelson Interferometry
- Accuracy
- Repeatability
- Resolution
- Fizeau Interferometry
- Accuracy
- Repeatability & Spectral Resolution
- Speed
- Typical Application
- TDLAS – Tuneable Diode Laser Absorption Spectroscopy
- Summary
1. Introduction
There two main Wavemeter techniques, scanning Michelson and static Fizeau Interferometers.
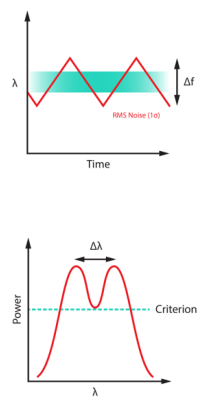
Customers using a Laser Wavemeter (or wavelength meter) typically are measuring a monochromatic source and are interested in the how accurately the system can measure the absolute wavelength of a Laser (wavelength resolution) and how it changes over time. Typically, this is done with a Michelson Interferometer.
Though a spectrum analyser can be used as a Wavemeter of monochromatic light, typically they are used to find the optical spectrum of a nonmonochromatic source, by applying a Fourier Transform to the nterferogram. Typically, the interest is in the spectral resolution (∆𝜆) of a system in order to differentiate between closely oscillating longitudinal modes.
From our experience at Laser 2000, customer’s mainly care about these three wavelength measurements and the trade-off with cost. 1) Accuracy 2) Repeatability & Resolution 3) Speed
2. Michelson interferometer
Systems based on a Michelson Interferometry from Bristol Instruments are the 671 Laser Wavelength meter which is for CW lasers and the 771/772 Laser Spectrum Analyser used for Pulsed and CW Lasers between 375nm and 12um.
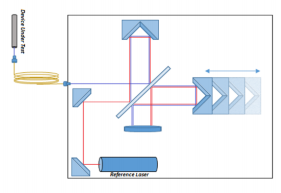
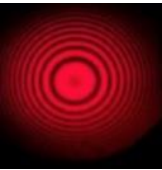
A Michelson interferometer has two separate arms and a single beam splitter which equally separates the beam. One of the beams is sent towards a stationary mirror whilst the other is sent to a moving mirror, the reflected beams are then recombined at the beam splitter and recorded by a photodetector. The recombined waves form an interference pattern causing a series of light and dark concentric rings.
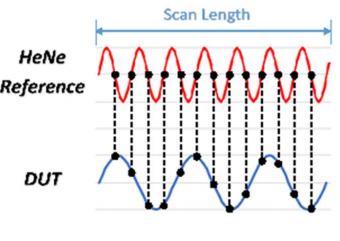
As the mirror is moved (scanned), optical path lengths that are in phase combine and constructive interference occurs. If the mirror causes a π phase shift, then destructive interference will occur. This causes successive rings of light and dark to change corresponding to a mirror translation of λ/4 and these can be counted (N). Therefore, when measuring monochromatic light, one would obtain a sinusoidal oscillation of the power by the photodetector as a function of the arm length difference.
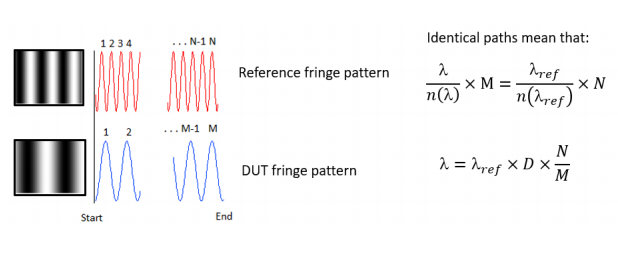
Various types of error can affect the measurement accuracy, such as length drifts in the interferometer arms caused for example by temperature change. These can be removed by simultaneously recording a signal by a stabilised reference laser with a known wavelength.
The reference fringes are also counted (M) and as the dispersion (D) of air varies slowly with temperature and pressure to a few parts in 108 the wavelength can be calculated as both lasers travel the same optical path but in opposite directions.
Accuracy
The most important aspect of a laser wavelength meter is its accuracy. Wavelength accuracy is quantified by Bristol Instruments using the NIST definition for expanded uncertainty. Components of error arising from both systematic and random effects are included. Systematic errors result in an off set between the measured value and the true value. Random errors result in measurements that have a statistical distribution associated with short-term measurement repeatability.
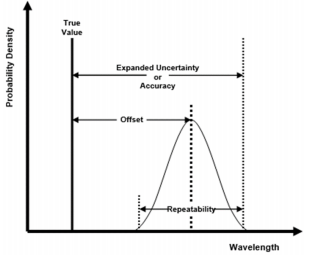
Accuracy specification is defined as the measurement uncertainty, or maximum wavelength error, using a coverage factor of three. This coverage factor is a multiplier that is applied to the standard uncertainty, which is determined from both systematic effects and from random effects, to ensure a confidence level of ≥ 99.7%. This means that more than 99.7% of the wavelength measurements are guaranteed to be within the specified accuracy limits from the true laser wavelength.
The 671 Wavelength is continuously calibrated with a built in HeNe, which is an ideal reference as it is well known and fixed by a fundamental atomic structure.
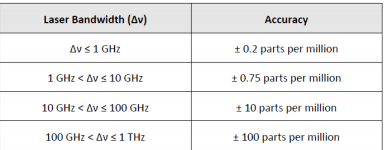
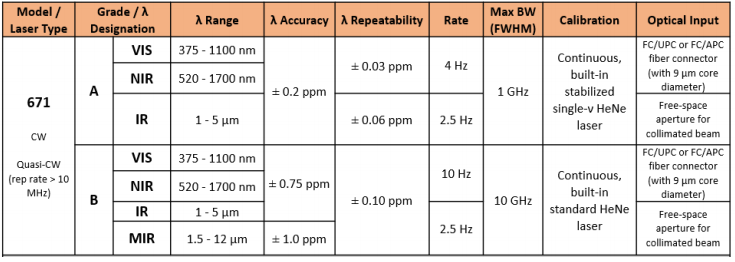
To measure wavelength to the highest accuracy of ± 0.2 parts per million, the 671A system uses a stabilized single-frequency HeNe laser as a wavelength reference. This laser is stabilized using a very reliable balanced longitudinal mode technique.
A standard HeNe laser is used with the model 671B to achieve ± 0.75 parts per million accuracy.
The measurement accuracy is constrained by the Lasers bandwidth (full width at half max) of the laser under test. If the laser under test has a larger bandwidth, a wavelength measurement will be reported, but its accuracy will be reduced.
Accuracy is also affected by the beam profile and it is advantageous to have a single transverse mode laser beam where the laser stays roughly collimated along the path length. This can be easily achieved in the Visible/NIR (375nm to 1700nm) models by using a pre-aligned single mode input optical fibre connector.
Since optical fibre is not readily available for infrared wavelengths the MIR (1-5μm) and IR (1.5- 12μm) these versions use a free-space input aperture.
To help facilitate the alignment, the internal HeNe reference laser is emitted from the input aperture as a visible tracer beam. The laser under test must be precisely collinear to the beam to within 0.5 mm over a one-meter path from the input aperture.
Repeatability
The repeatability specification is given as the maximum standard deviation expected from the measurement data taken over a five-minute period after the system has reached thermal equilibrium.
Since the standard deviation of the measurements is an important component (random effects) of standard uncertainty, it must be as small as possible to ensure that the wavelength measurements fall within the specified accuracy limits.
At the very least, the standard deviation should be less than one third the accuracy specification. This is because 99.7% of the measurements will fall within three standard deviations, or “three-sigma,” of the mean. Only 68% and 95.4% of the measurements will fall within one standard deviation and two standard deviations of the mean, respectively.
If the light is polychromatic the Michelson Interferometer can record an interferogram which is the superposition from all the different wavelength components.
With fast Fourier transform analysis the power spectral density as a function of optical frequency (or wavelength) which is independent of spectral phase can be Smeasured.
This results in a unique instrument that operates as both a high-resolution spectrum analyser and a high-accuracy wavelength meter, such as the 771 series.
It is important to understand that a longer scan length increases resolution as there are more fringes for the fast Fourier Transform (FFT) to fit. Also, the higher the measurement frequency the higher the Optical Signal to Noise Ratio (OSNR) as there is a better correlation to the actual fringe pattern signal.
Resolution
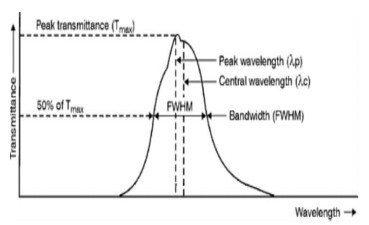
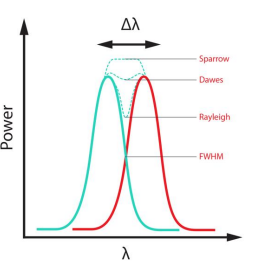
The Spectral resolution also denoted by (Δλ) is the ability to differentiate between two close lines in an optical spectrum or the spectral resolving power.
There are different ways this can be defined as shown opposite, but Bristol Instruments uses the measured full width at half maximum intensity (FWHM) of an infinitely narrow optical signal.
The 771 Laser Spectrum Analyzer provides a spectral resolution of 4 GHz (8 GHz with the IR version) combined with an optical rejection ratio of greater than 40 dB.
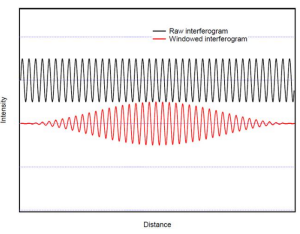
As the resolution is inversely proportional to the scan distance, artefacts can occur when applying the Fourier Transform to a finite length interferogram. By using the approximate Blackman window function these artefacts can be suppressed. Other window functions can be used to achieve a spectral resolution as high as 2 GHz (4 GHz with the IR version).
However, this will result in a lower optical rejection ratio and may result in a reduced wavelength measurement accuracy.
The Optical Rejection Ratio (ORR) of a laser spectrum analyser defines its ability to measure a low intensity signal near a higher intensity peak. It is the ratio between the measured noise level at a given distance from the peak and the intensity of the peak. The ORR of the 771 Laser Spectrum Analyzer is greater than 40 dB (30 dB with the MIR version), the highest available for a Fourier transform-based laser spectrum analyser. This is important because a laser spectrum analyser with a higher ORR can provide a more detailed spectral response.
3. Fizeau Interferometry
Michelson Interferometry techniques use a moving mirror to generate a temporal interference pattern for analysis. Since this interference pattern is generated over time, scanning-mirror Michelson interferometer technology can only be used with CW lasers, Quasi-CW (>10MHz PRF) or lasers with pulse repetition frequencies greater than 50kHz and pulse widths longer than 50ns. That is, the laser under test must be “on” during the entire scan of the moving mirror.
If the fastest measurement rate of CW lasers or wavelength measurement of pulsed lasers is required, a different method must be used. The 871 Pulsed Laser Wavelength Meter uses Fizeau etalon technology to make this measurement.
Two versions of the 871 Laser Wavelength Meter are available. The model 871A is offered for the most demanding experiments, measuring laser wavelength to the highest accuracy of ± 0.2 parts per million (± 0.0002 nm at 1000 nm). For experiments that are less exacting, the model 871B is a lower-priced alternative with a wavelength accuracy of ± 0.75 parts per million (± 0.0008 nm at 1000 nm).
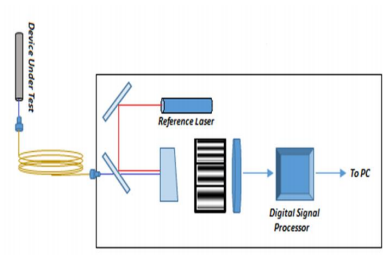
When a collimated laser beam passes through a wedged-mirror Fizeau etalon, a spatial interference pattern, with fringe spacing that is proportional to wavelength, is generated and detected by a photodetector array for analysis.
Since this spatial interference pattern has no time dependence, the laser under test does not have to be “on” all the time. Therefore, the wavelength of a pulsed laser can be determined.
In this regime fringe counting is not possible and a Fourier Transform is used to calculate the spectrum of interest. Successive wavelength estimates based on the etalons increasing thickness gives accuracy and precision.
The reason for this improved performance is due to the spatial nature of Fizeau etalon technology. Since laser wavelength is determined by analysing the spatial interference pattern generated by a Fizeau etalon, the spatial quality of the incident laser beam is critical.
Therefore, a Fizeau etalon-based wavelength meter works best with a laser beam that exhibits a uniform and stable spatial intensity profile. This is easily achieved with single-mode optical fibres because they are designed to support only a single propagation mode.
Accuracy
To ensure the most meaningful experimental results, the wavelength accuracy specifications are guaranteed by automatic calibration with a built-in reference laser.
The VIS models (375 – 1100 nm) use a 633 nm stabilized single-frequency HeNe laser with a wavelength that is fixed by fundamental atomic structure.
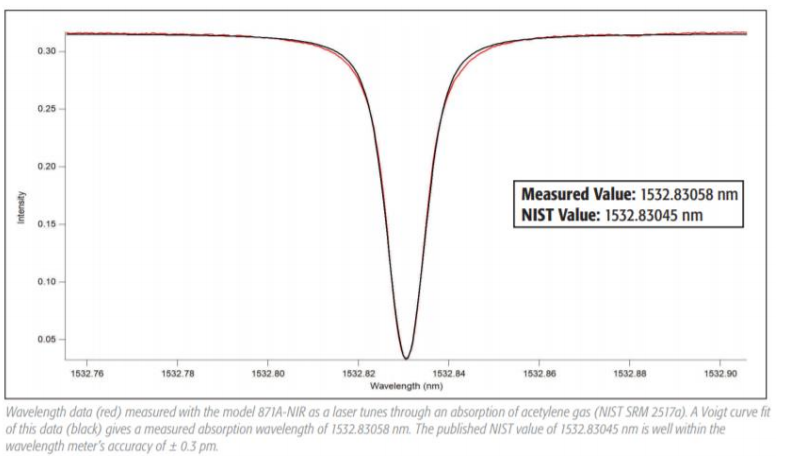
The wavelength reference for the NIR models (630 – 1700 nm) and the NIR2 model (1-2.5μm) is a 1532 nm laser diode that is locked to an absorption line of acetylene.
According to NIST Special Publication 260-133, the wavelength of this absorption line is known to better than one part in 10^8.
Repeatability & Spectral Resolution
The repeatability of the 871 is specified at ± 0.1 parts per million and is the maximum standard deviation expected from the measurement data taken over a 10-minute period after the system has reached thermal equilibrium.
The repeatability specification also gives an indication of the 871 system’s spectral resolution, which defines the minimum detectable change in the wavelength of a laser under test. The spectral resolution is approximately two times the repeatability specification. For the model 871B, the repeatability is ± 0.1 part per million. This is about 30 MHz at 1000 nm. Therefore, the spectral resolution would be about 60 MHz resulting in the ability to detect a change in wavelength as small as 0.0002 nm at 1000 nm.
The Fizeau etalon technology used for the model 871 does not allow for continuous calibration like with the Michelson interferometer-based wavelength meters. That is, the 871 system can analyse only one laser source at a time. Therefore, the calibration process temporarily interrupts wavelength measurement for less than one second. Calibration can be set to activate automatically at a chosen time interval or based on the system’s internal thermal conditions.
It is worth noting that axial mode spacing also known as free spectral range (FSR) i.e. the frequency spacing of its axial resonator modes of the systems Fizeau etalon is often stated by various manufacturers but the maximum bandwidth of the device is not specified and is inferred. However, this does not mean that the specified accuracy can be achieved for lasers with a bandwidth up to the limit defined by the FSR. It can be a factor of 3-5 of the laser width.
Speed
With the onboard digital signal processor, the Interferometric data generated by the Fizeau etalons can be converted into an accurate wavelength at rates as high as 1kHz. At greater repetition rates, the system integrates all laser pulses arriving within the measurement window. In addition, the system’s time resolution of 1ms provides the most detailed wavelength characterization.
Some instruments interferometric data analysis and actual wavelength calculation is done entirely by the user’s personal computer. Therefore, the measurement rate can actually be the photodetector acquisition rate and not a sustained wavelength measurement rate. The sustained measurement rate may be limited by the need to transfer a tremendous amount of interferometric data from the instrument to the user’s PC.
The model 871B-VIS can continuously measure the wavelength of every pulse of a laser operating with a repetition rate of≤ 500 Hz.
The model 871B-NIR can continuously measure every pulse of a laser operating with a repetition rate of ≤ 1 kHz. At greater repetition rates, the system integrates all laser pulses arriving within the measurement window.
When the model 871 is used with pulsed lasers, the wavelength measurement can be triggered automatically to allow for asynchronous operation. This means that a wavelength measurement is made only when a laser pulse is detected by the system. The model 871 can also be triggered by a user supplied signal for custom applications. For operation with CW lasers, wavelength measurements are made continuously.
4. Application – Tuneable Diode Laser Spectroscopy (TDLAS)
TDLAS exploits the rotational vibrational absorption features of gases for semiconductor laser-based trace gas detection. Sometimes it is referred to as TDLAS, TLS, TLAS or (with a reference) as TDLARS. Commonly used in the Oil & Gas Industry for things like quality control in natural gas pipelines & Ethylene production, if is also used for leak detection of hazardous gases, process optimisation and Environmental Monitoring.
Concept of TDLAS
TDLAS is one of the most sensitive, selective and robust technologies for trace gas monitoring.
It is based on the Lambert-Beer law which states a logarithmic relation between the
- Transmission of light through a gas
- Product of the attenuation coefficient of the gas
- Distance the light travels through the gas
When a gas has an absorption feature at a specific wavelength, the transmitted intensity declines exponentially with: 𝐼(𝑣,𝑡) = 𝐼𝑜(𝑣)𝑒^(−𝑆(𝑇)𝑔(𝑣,𝑣𝑜)𝑛𝐿).
With n being the number density of the molecular absorbers, 𝐼𝑜(𝑣) the initial laser intensity and 𝐼(𝑣,𝑡) the intensity detected after the probe with an absorption length L.
The absorption line profile is characterized by the temperature-dependent, spectrally integrated line strength S(T), and the normalized (area=1) shape function 𝑔(𝑣, 𝑣𝑜 ), centred at the wavelength 𝑣𝑜.
Standard TDLAS setup
A standard TDLAS setup is illustrated below. It consists of:
- Tuneable DFB laser; emitting monochromatic light at the absorption line of the trace gas
- an optical lens to collimate the laser light
- a gas sample cell: in this case filled with CH4
- a photo detector on which the laser light is focused, measuring the transmission

With many of our customers moving to Mid-IR light (Why? See my previous LinkedIn article ‘Why is Mid-IR light so important?’) Bristol Instruments has a unique value proposition of having both its Michelson and Fizeau Interferometers working in the 1-12um range for both for CW and Pulsed Lasers.
Our customers in this application space are using a wavemeter or spectrum analyser for incoming Laser test, where specifications such as Laser chip centre wavelength; how the laser tunes wavelength with junction temperature/current and the frequency stability of the laser are recorded.
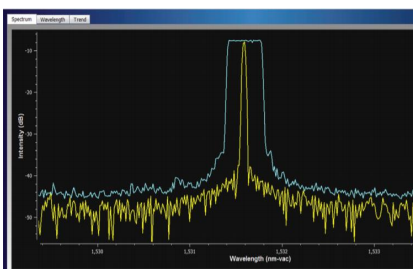
Using the 771 Laser spectrum analyser as an example, it can record the highest intensity of each point of the spectrum recorded over time and displayed with the current measured spectrum.
This is demonstrated in the following spectrum of a temperature-tuned DFB laser. The temperature is continuously cycled resulting in an “effective” laser bandwidth of about 0.25 nm shown in blue. The last measured spectrum is shown in yellow.
Interferometric data generated by the Fizeau etalons can be converted into an accurate wavelength at rates as high as 1kHz. At greater repetition rates, the system integrates all laser pulses arriving within the measurement window. In addition, the system’s time resolution of 1ms provides the most detailed wavelength characterization.
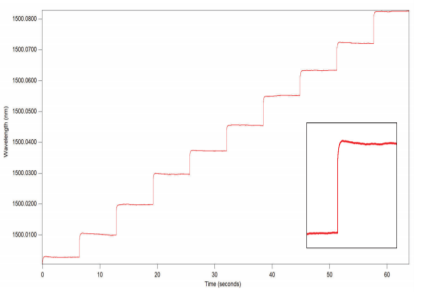
This can be seen in the graph opposite, which shows the tuning characteristics of a tuneable external cavity diode laser. The inset details show where the laser wavelength overshoots and then settles on target.
5. Summary
Hopefully, above we have answered some of the questions asked by our customers and shown that we understand the requirements for accurate and reliable laser test and measurement.
Below is an overview of the various devices and links to the brochures, which may be helpful for customers wanting to covert accuracy in ppm to pm/nm or MHz/nm.
671 Laser Wavemeter – Michelson Interferometer.
771/772 Laser Spectrum Analyser – – Michelson Interferometer.

871 Pulsed Laser Wavelength Meter and Spectrum Analyser – Fizeau Interferometer.

Want to loan a unit to test in your application? Contact us here:
Other Blogs/Articles that may be of interest:
- Why is Mid-IR Light so Important?
- Engineered Point Spread Functions (PSF) for Single Molecule Localisation Microscopy (SMLM)
- Nanoscopy for less than £100k?
- Understanding the jargon of LCOS Spatial Light Modulators (SLMs)
- Spatial Light Modulator Applications


